This article is intended primarily for those who first came to the site with a desire to learn how to photograph. It will act as a guide to the rest of the site's materials, which you should pay attention to if you suddenly decide to "pump" your photography skill.
Before learning to photograph, you need to decide for yourself - why do I need it and how deep am I ready to dive into it? Probably everyone has seen a similar caricature of the scheme of human evolution:
Image from the Internet
Sometimes this picture draws a line between a photographer with a cell phone and a tripod and the caption "some people should stop here."
The article you are reading has been in existence since 2008 and once every couple of years it is thoroughly edited in accordance with current trends and trends in the field of photography - amateur and professional. For 10 years of existence, this article has changed its content by almost 100%! This is due to the fact that we now live in a critical era, when photography has turned from the lot of professionals and enthusiasts into a general hobby. And not even a hobby, but integral part Everyday life. You probably already guess that we are talking about mobile photography. On the one hand, this is very cool, but on the other hand ... Photography, due to its mass nature, ceases to be art. Every day, millions (if not billions) of the same type of photos with flowers, cats, plates of food, selfies and other nonsense are uploaded to the Internet, and, oddly enough, all this finds its viewer - "Instagram stars" gain millions of likes for unsharp photos like " me and my cat." Just because their pictures are understandable and close to the majority. Photos of recognized masters have a much lower rating among the general public - they do not understand them. Approximately the same as comparing two areas of music - pop and, say, jazz.
Let's get back to the question - why do you want to learn photography? If you're doing it just because it's "fashionable" or "prestigious" - don't bother. This mod will soon pass. If you really want to "rise above the hustle and bustle", this article is for you!
Some boring theory
First of all, it should be noted that photography consists of two inextricably linked parts - creative and technical.
The creative part is born from your imagination and vision of the plot. Her understanding comes with experience. Photographic luck can also be counted among it - the more experienced the photographer, the more often he is "lucky" with the plot, shooting conditions. When I started my creative way, I looked at the works of advanced authors on photosight.ru and perceived them as some kind of magic. I recently reviewed the list of selected works and realized that there is no magic in them, just a lot of experience and a fair amount of luck :)
The technical part is a sequence of button presses, mode selection, setting shooting parameters in order to realize a creative idea. The proportion can be creative and technical part can be different and depends only on your decision - with what camera will you take pictures, in what mode (auto or), in what format (), will you later or leave it as it is?
Learning to photograph means learning to combine the creative and technical parts in optimal proportions. It is not necessary to photograph everything in manual mode(Let's leave this to the "old school" followers), it is enough to know the features of your camera and be able to use them in accordance with the shooting conditions. When we see a beautiful picture, it makes absolutely no difference to us how the artist held the brush, how he mixed paints and how high his easel was. It's the same in photography. The main thing is the result, and how it was obtained is completely indifferent to the viewer.
What is the best camera to buy for learning photography?
If you really want to learn how to take pictures, you need a camera, not a smartphone. It is highly desirable that this camera be with interchangeable lenses. Smartphones are conceptually sharpened for shooting on the machine, and even if they have some manual settings. Trying to learn how to take photos using a smartphone, you will very quickly realize that you have hit the ceiling - for further development his photographic capabilities are lacking. The creative possibilities of any interchangeable lens camera are virtually unlimited.
To learn photography, it is not necessary to purchase the most modern and expensive equipment. Now amateur technology has developed so much that it satisfies the requirements of not only amateurs, but also advanced photographers with a large margin.
Now about the cameras themselves (more precisely, about the "carcasses"). There is no point in chasing the most modern models. They are expensive and generally don't have much of an advantage over predecessor cameras. The only thing that can induce a reasonable person to overpay for novelty is some radical updates, for example, a new generation matrix. In most other cases, innovations in photography have a very indirect relationship. For example, the number of focus sensors has increased by 5%, Wi-Fi control, a GPS sensor, and an ultra-high resolution touch screen have been added. It makes no sense to pay 20% more for such innovations compared to the previous model. I do not urge you to buy "junk", but I recommend a more sober approach to the choice between a new product and a previous generation camera. Prices for novelties are unreasonably high, while the number of really useful innovations may not be so great.
Introduction to basic camera features
It is advisable to be patient and study the instructions for the camera. Unfortunately, it is far from always written simply and clearly, however, this does not eliminate the need to study the location and purpose of the main controls. As a rule, there are not so many controls - a mode dial, one or two dials for setting parameters, several function buttons, a zoom control, an autofocus and shutter button. It is also worth learning the main menu items in order to be able to configure things like . image style. All this comes with experience, but over time, you should not have a single incomprehensible item in the camera menu.
Getting to know the exposition
It's time to take the camera in hand and try to portray something with it. First, turn on the auto mode and try to take pictures in it. In most cases, the result will be quite normal, but sometimes photos turn out too light or, conversely, too dark for some reason.
It's time to get acquainted with such a thing as. Exposure is the total light flux that the matrix caught during the shutter release. The higher the exposure level, the brighter the photo will be. Photos that are too bright are called overexposed, photos that are too dark are called underexposed. The exposure level can be adjusted manually, but this cannot be done in auto mode. To be able to "brighten up or down", you need to switch to P (programmed exposure) mode.
Programmed exposure mode
This is the simplest "creative" mode, which combines the simplicity of auto mode and at the same time allows you to correct the operation of the machine - to make photos forced lighter or darker. This is done using exposure compensation. Exposure compensation is usually applied when either light or dark objects dominate the frame. Automation works in such a way that it tries to bring the average exposure level of the image to 18% gray tone (the so-called "gray card"). Please note that when we take more of the bright sky into the frame, the ground turns out to be darker in the photo. And vice versa, we take more land into the frame - the sky brightens, sometimes even whitens. The exposure compensation function helps to compensate for shadows and highlights that go beyond the boundaries of absolute black and absolute white.
Even in the program exposure mode, you can adjust the white balance, control the flash. This mode is convenient in that it requires a minimum of technical knowledge, but at the same time it is able to provide a much better result than full automatic.
Also in the program exposure mode, you have to get acquainted with such a thing as bar chart. This is nothing more than a graph of the distribution of the brightness of the pixels in the picture.

The left side of the histogram corresponds to the shadows, the right side - to the highlights. If the histogram looks "cropped" on the left, then the image contains black areas with lost color. Accordingly, the "cropped" histogram on the right indicates the presence of light areas "knocked out" into whiteness. Exposure compensation shifts the histogram to the right or left, making the image brighter or darker, respectively. Your task is to learn how to control the histogram and not let it crawl unnecessarily beyond its limits. In this case, the exposure of the picture is likely to be correct.
What is exposure?
No matter how good and convenient it is, alas, it does not always allow us to get the result we expected. A striking example is shooting moving objects. Try to go outside to take pictures of cars passing by. On a bright sunny day, this is likely to work out, but as soon as the sun goes behind a cloud, the cars will turn out to be slightly smeared. Moreover, the less light, the stronger this blur will be. Why is this happening?
The picture is exposed when the shutter opens. If fast moving objects enter the frame, then during the time the shutter is opened, they have time to move and the photos turn out to be slightly blurry. The time for which the shutter opens is called endurance.
Shutter speed allows you to get the effect of "frozen motion" (example below), or, conversely, blur moving objects.

The shutter speed is displayed as a unit divided by some number, for example, 1/500 - this means that the shutter will open for 1/500 of a second. This is a fast enough shutter speed at which driving cars and walking pedestrians will be clear in the photo. The faster the shutter speed, the faster the movement can be "frozen".
If you increase the shutter speed to, say, 1/125 second, the pedestrians will still be clear, but the cars will already be noticeably smeared. If the shutter speed is 1/50 or longer, the risk of getting blurry photos due to the shaking of the hands of the photographer increases and it is recommended to install the camera on a tripod , or use an image stabilizer (if available).
Night photos are taken with very long exposure in seconds or even minutes. Here it is already impossible to do without a tripod.
To be able to fix the shutter speed, the camera has a shutter priority mode. It is designated TV or S. In addition to a fixed shutter speed, it also allows you to use exposure compensation. Shutter speed has a direct effect on the level of exposure - the longer the shutter speed, the brighter the photo.
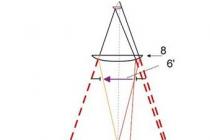
What is a diaphragm?
Another mode that can be useful is aperture priority mode.
Diaphragm- this is the "pupil" of the lens, a hole of variable diameter. The narrower this aperture, the more IPIG- the depth of the sharply depicted space. Aperture is indicated by a dimensionless number from the series 1.4, 2, 2.8, 4, 5.6, 8, 11, 16, 22, etc. IN modern cameras you can choose intermediate values, for example, 3.5, 7.1, 13, etc.
The larger the f-number, the greater the depth of field. Large depth of field is relevant for when you need everything to be sharp - both foreground and background. Landscapes are usually shot at apertures of 8 or more.

A typical example of a photograph with a large depth of field is the zone of sharpness from the grass under your feet to infinity.
The meaning of a small depth of field is to focus the viewer's attention on the subject, and blur all the background objects. This technique is commonly used in . To blur the background in a portrait, open the aperture to 2.8, 2, sometimes even up to 1.4. At this stage, we come to understand that whale lens 18-55 mm limits our creative possibilities, since at a "portrait" focal length of 55 mm, the aperture cannot be opened wider than 5.6 - we start thinking about a fast aperture (for example, 50mm 1.4) in order to get a similar result:

Small IPIG - great way switch the viewer's attention from the colorful background to the main object.
To control aperture, you need to switch the control dial to aperture priority mode (AV or A). At the same time, you tell the device what aperture you want to take pictures with, and it selects all the other parameters itself. Exposure compensation is also available in aperture priority mode.
Aperture has the opposite effect on the exposure level - the larger the f-number, the darker the picture is obtained (a pinched pupil lets in less light than an open one).
What is ISO sensitivity?
You have probably noticed that photos sometimes have ripples, grain, or, as it is also called, digital noise. Noise is especially pronounced in photographs taken in low light. For the presence / absence of ripples in the photographs, such a parameter is responsible as ISO sensitivity. This is the degree of susceptibility of the matrix to light. It is denoted by dimensionless units - 100, 200, 400, 800, 1600, 3200, etc.
When shooting at the lowest sensitivity (for example, ISO 100), the picture quality is the best, but you have to shoot with a slower shutter speed. With good lighting, for example, during the day on the street, this is not a problem. But if we go into a room in which there is much less light, then it will no longer be possible to shoot at the minimum sensitivity - the shutter speed will be, for example, 1/5 second and at the same time the risk is very high. shakers”, so called because of the trembling of the hands.
Here is an example of a photo taken at low ISO with a long exposure on a tripod:

Note that the swell on the river washed out in motion and gave the impression that the river was not ice. But there is almost no noise in the photo.
To avoid "shake" in low light, you need to either increase the ISO sensitivity in order to reduce the shutter speed to at least 1/50 second, or continue shooting at the minimum ISO and use. When shooting with a tripod at slow shutter speeds, moving objects are very blurred. This is especially noticeable when shooting at night. ISO sensitivity has a direct effect on the exposure level. The higher the ISO number, the brighter the picture will be at a fixed shutter speed and aperture.
Below is an example of a shot taken outdoors at ISO6400 late in the evening without a tripod:

Even in web size, it is noticeable that the photo turned out to be quite noisy. On the other hand, the grain effect is often used as an artistic technique, giving the photograph a "film" look.
Relationship between shutter speed, aperture and ISO
So, as you may have guessed, there are three parameters that affect the level of exposure - shutter speed, aperture and ISO sensitivity. There is such a thing as “exposure step” or EV (Exposure Value). Each next step corresponds to an exposure 2 times greater than the previous one. These three parameters are interrelated.
- if we open the aperture by 1 stop, the shutter speed is reduced by 1 stop
- if we open the aperture by 1 stop, the sensitivity decreases by one stop
- if we reduce the shutter speed by 1 step, the ISO sensitivity increases by one step
Manual mode
In manual mode, the photographer has the ability to control. This is necessary when we need to rigidly fix the exposure level and prevent the camera from being "amateur". For example, darken or lighten the foreground when more or less sky enters the frame, respectively.
Suitable for shooting under the same conditions, such as walking around the city on a sunny day. Once adjusted and in all the photos the same exposure level. The inconvenience in manual mode begins when you have to move between light and dark locations. If we go from the street, for example, to a cafe and shoot there at “street” settings, the photos will turn out to be too dark, since there is less light in the cafe.
Manual mode is indispensable when shooting panoramas and all thanks to the same property - to maintain a constant exposure level. When using auto exposure, the exposure level will depend heavily on the amount of light and dark objects. We caught a large dark object in the frame - we got sky flare. And vice versa, if light objects predominate in the frame, the shadows have gone into blackness. To glue such a panorama then one torment! So, to avoid this mistake, shoot panoramas in M mode, setting the exposure in advance so that all fragments are correctly exposed.

The result - when merging, there will be no "steps" of brightness between frames, which are likely to appear when shooting in any other mode.
In general, many experienced photographers and photography educators recommend using manual mode as the main one. They are somewhat right - when shooting in manual mode, you completely control the shooting process. You can choose the most correct combination of settings for a given from hundreds of options. The main thing is to know what you are doing and why. If there is no clear understanding of the principles of work in manual mode, you can limit yourself to semi-automatic ones - 99.9% of viewers will not notice the difference :)
In reporting conditions, the manual mode is also not very convenient, since you need to constantly adapt to changing shooting conditions. Many do it tricky - in M mode, they fix the shutter speed and aperture, while "releasing" the ISO. Although the mode selector is M, the shooting is far from being in manual mode - the camera itself selects the ISO sensitivity and flash power, and can change these parameters over a wide range.
Zoom and focal length
This is a characteristic that determines the angle of the lens' field of view. The shorter the focal length, the wider the angle covered by the lens, the longer the focal length, the more similar in its action to a telescope.
Often the concept of "focal length" in everyday life is replaced by "zoom". This is wrong, since zoom is just a ratio of change in focal length. If the maximum focal length is divided by the minimum, we get the zoom ratio.
Focal length is measured in millimeters. Now the term "equivalent focal length" has become widespread, it is used for cameras with a crop factor, of which the majority. Its purpose is to evaluate the angle of coverage of a particular lens / sensor combination and bring them to a full-frame equivalent. The formula is simple:
EGF \u003d FR * Kf
FR - real focal length, Kf (crop factor) - coefficient showing how many times the matrix this machine smaller than full frame (36*24mm).
So the equivalent focal length of an 18-55mm lens on a 1.5 crop would be 27-82mm. Below is indicative list focal length settings. I will be writing in full frame. If you have a camera with a crop factor, simply divide these numbers by the crop factor and you get the actual focal lengths you need to set on your lens.
- 24 mm or less- "wide angle". The coverage angle allows you to capture a fairly large sector of space in the frame. This allows you to well convey the depth of the frame and the distribution of plans. 24mm is characterized by a pronounced perspective effect, which tends to distort the proportions of objects at the edges of the frame. Often, it looks spectacular.

At 24mm, it is better not to photograph group portraits, since the extreme people can get slightly elongated diagonal heads. A focal length of 24mm or less is good for shooting landscapes dominated by sky and water.
- 35 mm- "short focus". Also good for landscape, as well as shooting people in the background of the landscape. The coverage angle is quite wide, but the perspective is less pronounced. At 35 mm, you can shoot full-length portraits, portraits in the situation.

- 50 mm- "normal lens". The focal length is mainly for shooting people not the most close-up. Single, group portrait, "street photography". The perspective roughly corresponds to what we are used to seeing with our own eyes. You can take pictures of the landscape, but not everyone - the angle of the field of view is no longer so large and does not allow you to convey depth and space.

- 85-100 mm- "portrait". The 85-100mm lens is well-suited for waist-length and larger portraits, mostly in a vertical frame. The most interesting picture allows you to get fast lenses with a fixed focal length, such as 85mm F:1.8. When shooting at an open aperture, "eighty-five" blurs the background very well, thereby emphasizing the main subject. For other genres, an 85 mm lens, if suitable, is a stretch. It is almost impossible to shoot the landscape on it, indoors most of the interior is outside its field of view.

- 135 mm- "close-up portrait". Focal length for close-up portraits in which the face takes up most of the frame. The so-called close-up portrait.
- 200 mm or more- "telephoto lens". Allows you to take close-up shots of distant objects. A woodpecker on a trunk, a roe deer at a watering hole, a football player with a ball in the middle of the field. Not bad for shooting small objects close-up - for example, a flower in a flower bed. The effect of perspective is practically absent. For portraits, it is better not to use such lenses, as the faces are visually wider and flatter. Below is an example of a photograph taken at a focal length of 600 mm - there is practically no perspective. Near and far objects at the same scale:

The focal (real!) distance, in addition to the scale of the image, affects the depth of the sharply depicted space (together with the aperture). The longer the focal length, the smaller the depth of field, respectively, the blurring of the background is stronger. This is another reason not to use a wide-angle lens for portraits if you want background blur. Here lies the answer and the question is why "" and smartphones do not blur the background well in portraits. Their real focal length is several times less than that of SLR and system cameras (mirrorless).
Composition in photography
Now that we have dealt with the technical part in general terms, it's time to talk about such a thing as composition. In a nutshell, composition in photography is the mutual arrangement and interaction of objects and light sources in the frame, thanks to which the photographic work looks harmonious and complete. There are a lot of rules, I will list the main ones, those that need to be learned first.
Light is your most important visual medium. Depending on the angle of incidence of light on an object, it can look completely different. Black and white drawing - practically the only way convey volume in the photograph. Frontal light (flash, sun behind) hides the volume, objects look flat. If the light source is shifted slightly to the side, this is already better, a play of light and shadow appears. Counter (backlight) light makes pictures contrasting and dramatic, but you must first learn how to work with such light.

Do not try to fit the frame all at once, photograph only the essence. When photographing something in the foreground, keep an eye on the background - it often contains unwanted objects. Poles, traffic lights, garbage cans, and the like - all these extra objects clog the composition and distract attention, they are called "photo debris".
Do not place the main subject in the center of the frame, move it slightly to the side. Leave more space in the frame in the direction where the main subject "looks". Try different options whenever possible, choose the best one.

"Zoom in" and "get closer" are not the same thing. The zoom increases the focal length of the lens, as a result of which the background is stretched and blurred - this is good for a portrait (within reason).
We shoot the portrait from the level of the eyes of the model from a distance of at least 2 meters. Lack of zoom by increasing the focal length (zoom in). If we photograph children, we don’t need to do it from the height of our height, we will get a portrait against the background of the floor, asphalt, grass. Sit down!
Try not to shoot a portrait from a frontal angle (like a passport). Turning the model's face towards the main light source is always beneficial. You can try other angles as well. The main thing is light!

Make the most of natural light - it's more artistic and "alive" than flash lighting. Remember that a window is a great source of soft, diffused light, almost like a softbox. With the help of curtains and tulle, you can change the intensity of light and its softness. The closer the model is to the window, the more contrast the lighting.
When shooting "in the crowd" it is almost always advantageous to take a high point of view, when the camera is held on outstretched arms. Some photographers even use a ladder.
Try to keep the horizon line from cutting the frame into two equal halves. If there is more interesting in the foreground, place the horizon at a level of approximately 2/3 from the bottom edge (earth - 2/3, sky - 1/3), if in the background - respectively, at 1/3 level (earth - 1/3, sky - 2/3). It's also called the "rule of thirds". If you can't bind the key objects exactly to the "thirds", place them symmetrically to each other relative to the center:

To process or not to process?
For many, this is a sore point - is a photo processed in Photoshop considered "live" and "real". In this opinion, people are divided into two camps - some are categorically against processing, others - for the fact that there is nothing wrong with processing photos. Personally, my opinion about the processing is as follows:
- Any photographer should have at least basic photo processing skills - correct the horizon, crop, cover up a speck of dust on the matrix, adjust the exposure level, white balance.
- Learn to take pictures so that you don't edit them later. This saves a lot of time!
- If the picture initially turned out well, think a hundred times before you somehow programmatically "improve" it.
- Converting a photo to b/w, toning, graininess, applying filters does not automatically make it artistic, but there is a chance to slip into bad taste.
- When processing a photo, you need to know what you want to get. No need to do processing for the sake of processing.
- Explore the features of the programs you use. There are probably features that you do not know about that will allow you to achieve the result faster and better.
- Don't get carried away with color grading without a quality calibrated monitor. Just because an image looks good on your laptop screen doesn't mean it will look good on other screens or when printed.
- The processed photo should be "aged". Before you publish it and give it to print, leave it for a couple of days, and then look with a fresh eye - it is quite possible that you want to redo a lot.
Conclusion
I hope you understand that learning to photograph by reading one article will not work. Yes, I, in fact, did not set such a goal - to “lay out” in it everything that I know. The purpose of the article is only to briefly talk about the simple truths of photography, without going into subtleties and details, but simply to open the veil. I tried to write in a concise and accessible language, but even so, the article turned out to be quite voluminous - and this is just the tip of the iceberg!
If you are interested in a deeper study of the topic, I can offer my paid materials on photography. They are presented in the form e-books in PDF format. You can get acquainted with their list and trial versions here -.
Translator's note: This article is an introductory material that gives brief description simple but critical items for professional photography. For beginners, such tips will help to avoid many mistakes and get closer to professionals faster, as well as push them to further study the necessary materials.
If you want to take good photos, these tips, tricks and techniques from top-notch photographer Tigz Rice will help you improve your skills.
Whether you want to take pictures for design work, photograph models for illustrations, or anything else, these tips will come in handy for everyone.
In the next 15 paragraphs, Tigz will cover gear, lighting and editing - everything you need to know to get the best photos.
1. Make a plan

Before you take the camera, make a couple of sketches or a storyboard of what you want to get. This will allow you to stick to a certain idea during the shooting.
2. Background

A solid background color in the studio will make sure that the subject is the focal point and will be easier to separate in case you need to create a composition.
Gray is a great color as it suits most situations well. You can also shoot against a white background for a lighter composition, or black for dark shots.
Whichever background you choose, make sure the background color doesn't match the subject's color.
3. Light sources

Also, if you plan to make a composite image, you need to make sure that all the objects/people in it are shot with the same light source(s).
Before pressing the camera shutter button, think about where the subject will be located and at what angle the light will fall on it. Perhaps it needs to be illuminated from above or below?
It is also worth considering the type and color of lighting. We will talk about this in the next steps.
4. Natural light: "golden hour"

Everyone can benefit from natural light, although its quality varies greatly depending on location, time of day and weather.
If you rely on natural light, the most best time for shooting - the so-called "golden hour". This is the last hour before sunset, when the sun is already close to the horizon.
5. Natural light: hard light

At noon, when the sun's rays fall almost perpendicular to the ground, hard shadows are obtained, especially under the eyes and chin. If you have to shoot at this time of day, place your subject in the shade or use a reflector to diffuse some of the light and soften the shadows.
Alternatively, you can try shooting indoors near a window, using mesh curtains to diffuse the light. However, hard light can be used to your advantage - great for capturing textures!
6. Artificial light

If natural lighting is not an option, you can always create it yourself. Light sources such as lamps can be a great help in illuminating areas of the frame and are probably always readily available.
If you don't want to tread on the beginner's level, a flash, along with wireless shutter releases, or even a set of portable lights, is a good investment.
7. Camera

Obviously, if you want the best results, a DSLR or a compact mirrorless camera with interchangeable lenses is a must. Both views provide full control over settings. How to properly dispose of them - read in the following paragraphs.
There are plenty of camera options for every wallet, so you can always find the best model.
8. The right lens

To some, this point may also seem too simple, but it would still be nice to recall it. The lens is an important part of the camera and should be chosen wisely. Each lens has its own focal length, which ranges from wide (14mm) to telephoto (200 - 400mm).
50mm is the best option for most situations if you're just trying your hand at photography and want something cheap, simple, and better than a kit camera lens.
The next step is to invest in 85mm/135mm for portrait and detail shots, and 35mm for landscape photography.
9. Shoot in RAW

If you're using a DSLR or mirrorless, make sure you're shooting RAW and not JPEG.
This will allow the camera to shoot and process images without compression, leaving more room for processing in Lightroom or Photoshop in case you need to correct the exposure.
10. Working in the dark

Whether you're shooting with a DLSR or a compact mirrorless, you've got a lot of flexibility in how you control your sensor sensitivity with ISO control.
The higher the value, the more noise there will be in the picture, so try to set the ISO to the minimum allowable mark. Here are some examples for different situations.
- Outside in sunny weather: 100-200
- Outside on a cloudy day: 400
- In a well lit room: 800-1000
- In a dark room: 1600-2000
11. Depth of field

Aperture doesn't just adjust the size of the hole that lets in light, it also controls how much of the frame is in focus depending on the distance.
If you need sharp focus from foreground to background, shoot at f/8 or higher. Otherwise, if you want blurry backgrounds and a sense of depth, experiment with f/1.8.
12. High-speed shooting

Fast shutter speeds (1/200s or slower) are great when you need to freeze the moment, while slow shutter speeds (1s or more) can help convey a sense of movement or create a slow-motion effect.
When working with slow shutter speeds, remember to take a tripod and shutter release with you to prevent camera shake.
13. Different options

Once you've got the shot you want, take a couple more shots, varying the data. The main challenge is posing, so once you're done, try shooting from different angles, settings, and lighting styles. If a lot of time is spent on framing a shot, then this approach can save a lot of time later.
14. Color harmony

If conditions are limited and you have to use different light sources, you may need to correct the colors to make the picture look harmonious.
This can be done with the tool white balance(White Balance) in the Adobe Camera Raw or Lightroom module. Or you can read the tutorial.
15. Smart background cropping

After release Adobe Photoshop With CC 2015.5, it's even easier to cut out the background. Why not take advantage of this? Read about it in the article How to use the tools
In the life of every person there are many events that you want to keep in memory for a long time. That is why we love photographing them so much. However, it often happens that our photos come out unsuccessful, and they are even embarrassing to print. In order for the photos to turn out beautiful, you need to master several important rules, the main of which are the golden ratio and composition.
Special attention you need to pay attention to the choice of a camera (phone), but you should understand that this is just a tool in your hands. Think about why, being in the same place, people get different pictures? Photos can be so different that people from the outside might think that different places were photographed. It is clear that the matter is not only in the camera (phone), but also in the personal skills of the photographer. After all, if you know what a street shot and composition are, and also know a couple more rules, then you can take very beautiful photos that you will not be ashamed to show to others by posting them in social media or hung on the wall.

Composition
If you are wondering how to make good photo, then the first thing you should master is the rules of composition. Composition is the harmonious arrangement of objects in a photograph. Thanks to her, the photo looks more holistic, and also acquires meaning.

In order to see the composition, you need:
- choose a suitable point for the frame (walk around and see how the object will look from different angles, because even a slight shift can change the photo in better side);
- choose correct placement objects in space.
It rarely happens that a photo has a good composition from the very beginning, most often the photographer needs to create it himself. Every time you take a picture, pay attention to the composition, and then, through certain time you will be able to feel it automatically on a subconscious level.
This is not as simple as it might seem at first glance. To increase the level of perception of the composition, you need to master several fundamental rules:
- Separation of the subject from the elements of the background.
- Framing and perspective.
- The balance of the composition of the frame.
- Guide lines in the frame.
- The rule of the "golden section".
- Ease of composition.
Of course, these rules will not help you take a beautiful picture without a creative approach, so take them as guidelines. Below you will see more detailed description each of them.
Separating the subject from background elements

A photograph is a two-dimensional space, so in our perception, the foreground and background are combined together. Try to separate the background from the subject itself so that they overlap less. Pay attention to the fact that the object does not blend in color with the background. Choose a more neutral background. In order not to get ridiculous shots like those where a palm tree grows out of a person’s head, always pay attention to those objects that are behind, and just change the angle.
Framing and perspective
Cropping involves choosing the boundaries of the frame. For this purpose, you can use both objects located in the background, and those that are located in the frame itself. Cropping is very important, because it helps to give the image depth and additional focus on details. Thanks to this, the picture is more voluminous and lively. Let's say a photo of a boy running is cropped with a clearing line and side trees, so it looks more lively and voluminous. If this photo were cropped in such a way that only the boy and the line of the meadow remained on it, then it would turn out to be less interesting and "flat".
Frame composition balance
This is necessary for the picture to be harmonious. You can balance the composition with the help of another object (in the event that the additional object will not distract from the main one), the color components of the picture, shadows or the play of light. For this rule, you need to use your creative thinking.
Guide lines in the frame
Lines. They are always in the picture. Sometimes the lines are pronounced, an example is the road, tending into the distance, or the horizon. More often, lines are created by the objects themselves, located in a certain way in space, through which you can draw a conditionally straight (smooth) line or get an interesting geometric figure.

It can be used both to compose the plot of a photograph, to emphasize it, and to give harmony. good example the line that emphasizes and, as it were, directs to the object, can be a road leading to the building. Another example of a line that gives harmony to a photo is a directional sunbeam. Interesting photos are obtained when a line (more often a geometric figure) is used as a plot. For example, several people are put up as a figure. They often do flash mobs, in which a large number of people create a certain image.
The rule of the "golden section"
For correct location objects in the frame use the "golden section" rule. Its essence is to mentally impose a grid on the frame. The stack consists of three horizontal and vertical lines evenly spaced in space. Once you have drawn the frame visually, position the target object(s) along one of the grid lines or at grid nodes (where the lines intersect).

Example. Imagine a sailboat at sunset. If you place it right in the center, then the photo will be boring. If you apply the golden section rule, then the photo will immediately become more interesting, a view of the sunset beautifully reflected in the water will open.
Most often, a sunset located in the center will look ugly, as the photo will be visually divided into two parts, and the emphasis of the photo will also be incomprehensible.

If you are taking a picture of a static object, then take the frame not in the front, but at an angle, and also leave space in the direction where the object is directed. It is important that space is felt in front of the object. If you are photographing a person, then ask him to turn halfway towards you. If you are taking a photo of a building, then frame it so that the facade is not parallel to the plane of the photo, but is at some angle.
Simplicity of composition
Simplicity is important for photographing a particular subject. It lies in the fact that the subject occupies a dominant position. That is, when looking at a photograph, a person pays attention precisely to the object. For ease of composition, you need to be guided by three rules:
- Choose one object, as otherwise the viewer's attention will be scattered, which may break the composition.
- The subject must fill a large area of the frame.
- Choose the most simple background that does not contain distracting bright elements, thereby focusing attention on the object.
Example1. You want to capture the sunset. Then why would you include part of the bush in the picture?
Example 2. You want to rent a beautiful building. Then why would you turn on the part of the car that is in the parking lot?
Take a picture in such a way that the viewer can understand the purpose and meaning that was invested in it. Secondary parts should be brought into the frame in such a way as to complement it, and not distract from the main idea.
However, don't make the mistake of thinking that the frame's simplicity lies in the fact that it contains a single object! The essence of the simplicity of the composition is to highlight it. Thus, the viewer will pay attention first of all to the object itself, and only then to others that complement it.
Two tricks can be used to highlight:
- Play with scale. Make the main object larger in relation to the secondary ones.
- Shoot a specific subject.
Another secret is the location of the subject in the frame. Surely everyone has a photograph where he (she) stands against the background of the monument, and the position of the person is strictly in the middle of the frame. Such photographs are not interesting in the first place because it is not clear which of the objects is the main one. To figure out which photos are best to take, you should not place the object in the middle of the frame, this makes the photo boring. Try to move the subject away from the center to make the photo more lively and natural.
How to take a good photo so that the subject is located at the right point in it? Here we need a look into the future. For example, if you are shooting a moving subject, then try to free up space in front of it (in the direction of its movement).
Location selection
How to take a good photo? The above rules will help you. Often people worry about where the most beautiful shot will turn out. If you are just an amateur and are thinking about where to take good photos, then do not forget that we take pictures as a keepsake, capturing the pleasant moments of our lives. So don't worry about this issue. If you see a place you want to remember, then just take a photo!
General rules listed above will help you figure out how to take good photos with your phone. This is relevant because in Lately computers and cameras are well replaced by phones.
The question is how to do better quality photos, various programs will help you. On this moment There are a large number of programs and applications for processing and editing images. Rules for taking a good photo in Photoshop:
- Darken the highlights and add light to the shadows.
- Use vignettes and shadows.
- Use the clarity and sharpness settings to understand.
- Use filters.
So, we briefly decided how to do in Photoshop good quality photos.
However, these are not all pressing issues. If you are thinking about how to take a good photo on your ava, then give preference to those pictures where your face is clearly visible, those where you are happy and beautiful.
Bright photos that can decorate an album and break hundreds of likes in social networks are created not only on the seashore or in an expensive studio. Your own apartment can easily become the backdrop for great shots! Do you want to know how to make beautiful photo at home? Read the tips in our article!
How to take a beautiful photo at home on a smartphone
We will manage with minimal means - no SLR cameras or professional lighting. Just you, your smartphone and the tools at hand. The techniques that you can use to get high-quality pictures depend on what exactly you will be photographing.
1. Portrait
Shooting in front (the face looks directly into the camera) often creates flaws even where there were none. Try to turn half a turn towards the camera - this is one of the universal options that will suit most. This angle visually makes the face narrower, emphasizes the cheekbones and slender neck.

Even a slight turn of the head makes the face in the picture more attractive.
Even if you are shooting a portrait where all the attention of the viewer is riveted to the face, do not forget about what is around. Untidy clothes on a chair or a half-eaten lunch can spoil an attractive picture in no time. Try to have an interesting interior behind you.

Make sure the background is aesthetic
2. Product photography
If you like to take photos for Instagram, you will definitely need the ability to photograph small objects. Despite the apparent simplicity, there are enough pitfalls. You need to send an invoice the smallest details, accurate color. Do beautiful photo our tips will help you on your smartphone:

For subject photography it is good to use a small table where the object will be located. If you use natural light, you can settle on the windowsill. It is highly recommended to use a tripod, even if you are shooting from your phone. This will avoid hand trembling, to achieve maximum clarity.
How to take better photos
Even a good photo needs processing. The program will allow you to improve the quality of the photo, remove excess from the frame, retouch the portrait or apply effects. What opportunities does it offer?

Conclusion
It is real to take a beautiful photo at home without the participation of a professional photographer! A little creativity and imagination, a piece of patience and, of course, the irreplaceable help of the PhotoMASTER. will allow you to bring to mind any picture, correcting the shortcomings that are characteristic of almost any home photograph. Your apartment can easily become a great photo studio - go for it!

All efforts to create a website or an online store are worthless if you do not pay enough attention to the main thing - photos. Perhaps, it is not even necessary to explain that pictures not only make the page attract attention, but also make the visitor stay on your site for a long time. In addition, photos are easy to share on social networks, which greatly expands the possibilities of marketing.
To take great photos, you need quite a bit: good photographer With professional equipment, a studio (not necessarily a big one) and, preferably, an art manager who will figure out how to beautifully and originally photograph your products. There is only one catch - at the stage of launching your project, you are unlikely to have a budget that can painlessly cover the costs of such photography.
You will definitely do this when your business starts generating income, but in the meantime, you can shoot some very good shots at home. It is only important to know a few basic conditions for the correct subject photography for the site, and we will talk about them in our article.
Lighting
If the photo was taken in poor lighting, no processing will fix this situation: the pictures will be fuzzy, color reproduction will suffer. In the absence of spotlights and reflectors, it is necessary to look for light sources available at home. The best option is natural light from a window.
Avoid direct sunlight, they will give unnecessary highlights and harsh shadows. It is best to shoot on a bright but cloudy day. By the way, photos taken in such soft light are visually perceived better.
In the absence of a window suitable for filming or if you wish to shoot outside daytime days, you can make a softbox with your own hands - a nozzle for a direct light source that allows you to make the lighting soft and diffused. This is not so difficult, but it still requires skill, time and small material investments.
Look at the photo of wooden butterflies from the store twinsbowties.ru. With some effort, you can take these shots at home.


Style
First of all, a cool blog or online store is distinguished by a single style that is maintained for all pictures. Don't experiment uncontrollably with filters or shooting angles for each new photo. This does not mean that absolutely on all photos the product should be located only in a certain way and nothing else.
Look at the photo from the store www.afourcustom.ru. It seems that they are all different, but they have common features, inherent in the pictures only of this store.


Another type of photographs that are attractive to buyers is pictures in which you can estimate the size of the proposed item, for example, as in a store. kokosina.com .


If we talk about the variety of shooting angles for a blog or website, then everything is simpler - the visitor is simply interested in viewing things from all sides. And he will probably stay longer on your page, flipping through the pictures.