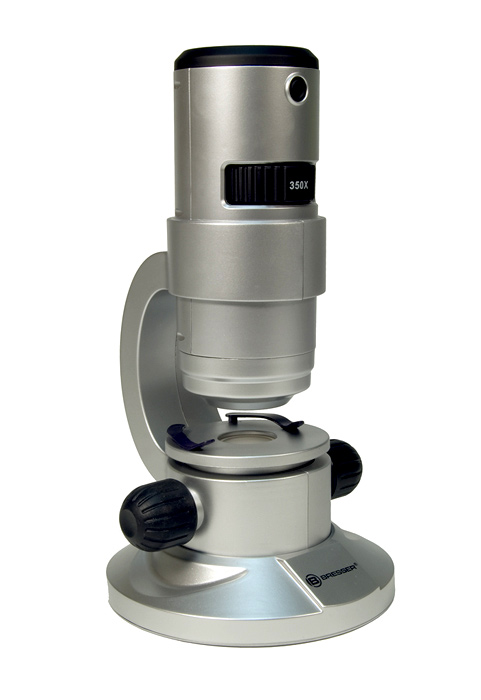
The microscope is one of the most important inventions of mankind, which allowed us to delve into the study of the world around us. And this incredible discovery was made by the Dutch scientist Anton Van Leeuwenhoek. It was he who became a pioneer in microscopy, pointing several lenses at water and plants and discovering that with a certain installation and the order of fastening lenses, you can see a completely new world hidden from the naked human eye.
This discovery brought the scientist worldwide fame and recognition. Throughout his life, he made more than three hundred instruments. At that time, they consisted of a small spherical lens, which had a diameter of about half a centimeter, an object table, which, with the help of a screw, could be brought closer and further away from the lens. A tripod was not provided, which was inconvenient, since the device was held in the hands.
If you look at this invention from the point of view of modern optics, then the discovery of the Dutch scientist can rather be attributed to a strong magnifying glass, since the optical part of this device has only one lens.
Gradually microscopes evolved and became stronger and more perfect. Now with their help it is possible to examine even the smallest particles of our world, cells, viruses, bacteria.
A microscope operates on the same principle as a reflecting telescope. In a telescope, light rays, when they pass through glass or a glass lens, are refracted at a certain angle. The telescope gathers parallel beams together into a focal point, from where we can see it with the help of an eyepiece. As for the microscope, then there is a very similar principle of operation. First, the diverging beam of light becomes parallel, after which it is refracted in the eyepiece so that the observer can see the picture.
- Eyepiece
- tube
- Holder
- Coarse focus screw
- Fine (micrometer) focusing screw
- Turret
- Lens
- Subject table

- Illuminator
- Iris field diaphragm
- Mirror
- Iris aperture diaphragm
- Condenser
- A drug
- Enlarged actual intermediate image of the preparation formed by the lens
- Enlarged virtual final image of the preparation, observed in the eyepiece
- Lens
- Eyepiece
Functional Compounds of the Microscope
This equipment contains three main components: lighting, reproducing and visualizing. The lighting component of the microscope is necessary in order to recreate the flow of light so that other parts of the device do their job as accurately as possible. The lighting part of the equipment for the transmitted light flux is located directly behind the preparation, if the microscope is straight, and if the microscope is inverted, then in front of the object and over the objective.
The lighting component of the device contains a source of illumination, which can be represented by a lamp, or an electric power supply, as well as all kinds of mechanical optics, which include: condensers, collectors, field and aperture adjustable and iris diaphragms.
The reproducing component of the microscope is needed in order to reproduce the object directly in the horizontal of the picture with the necessary visual qualities and magnification for consideration. This means that the reproducing component is needed for such an image display in the eyepiece, which most accurately and in detail shows the object with a certain resolution for microscope optics by color and contrast reproduction.
With the help of the reproducing part, it is possible to achieve the first stage of image magnification and it is located behind the object to the horizontal image of the device. The reproducing parts of the device also have lenses, and intermediate systems of stationary optics.
Today, this equipment works with the help of special systems of lenses and optics, which are corrected for the infinity mark. To do this, tube systems are used in the instruments, thanks to which parallel beams of light emerging through the lens are connected in the image plane in the microscope.
Visualizing composite devices are necessary in order to obtain a real picture of the object under study on the retina, plate, film, on a monitor with a large second degree of magnification.
The imaging part in a microscope is located between the camera or retina, and the horizontal image of the lens. These parts contain visual attachments of the monocular, binocular or trinocular type with special observation systems, which are eyepieces that work like a magnifying glass.
In addition, the imaging part of the microscope also contains additional magnifying systems, all kinds of nozzles for projection, including also discussion ones for several researchers. The system also includes devices for drawing, analyzing, and fixing an image with certain matching parts.
The main ways to work with a microscope

The bright field method with passing light rays is used to study transparent objects with various inhomogeneous components. These can be sections of plant and animal tissue, individual minerals, as well as the simplest microorganisms in a liquid. The condenser as well as the light source cost less than the stage. The image of the object is formed by a light beam that passes through the transparent part and is absorbed by the components with a denser consistency. If there is a need to increase the contrast of the image, then dyes can be added, the degree of concentration of which increases with the density of the object area.
A bright field in a reflected light beam is necessary in order to see opaque objects, and all kinds of objects from which it is not possible to take a sample to create translucent preparations. The light on the object of study passes through the top, as a rule, through the lens, which in this version also serves as a kind of condenser.
Darkfield and oblique illumination methods are used to study objects with extremely low contrast, such as transparent living cells. The light for studying the subject is supplied not from below, but from the side, because of which shadows appear, due to which dense parts become apparent. If the illumination of the condenser is moved so that its light does not hit the objective, and the sample is illuminated by rays from the side, a white objective can be seen on a black background. Both of these methods are suitable only for devices in which it is possible to change the location of the condenser relative to the axis of the optics.
The microscope must be positioned correctly in the workplace in order to work comfortably and stress-free. To do this, the microscope is set in such a way that its eyepieces are located at the level of the edge of the table. The height of the chair is chosen so that the eyepieces are located just above eye level in order to look without bending over.
A modern microscope is a precision optical instrument that requires careful handling and meticulous care. With proper care, the microscope can last for many years.
The main requirements for microscope care are:
Careful attitude;
Compliance with the operating instructions;
Protection against dust, chemically aggressive substances and vapors;
Timely troubleshooting;
Annual preventive examination by an experienced specialist.
The microscope must be protected from dust by covering it with a special cover. To remove dust from the surface of ocular lenses, condenser lenses, mirrors and other glass surfaces, use a dry, defatted hair brush. For degreasing, the brush is rinsed in Nikiforov's mixture and dried thoroughly. The defatted brush should be stored in a dry, stoppered tube.
To remove fingerprints, use a soft, dust-free, suede cloth, linen cloth, or cellulose spectacle wipe.
The front lenses of the objectives are cleaned with a linen or cellulose cloth. The napkin is put on the tip of the finger, impregnated with a small amount of xylene or benzene (not alcohol!) To remove immersion oil, lightly pressed against the front lens and rotated to the right and left.
When changing lenses, store them in a plastic case with a screw cap. The free hole in the revolver is closed with a plastic threaded plug.
Getting started, you must follow these recommendations:
1. First of all, it is necessary to ensure that the distance between the binocular eyepieces corresponds to the distance between the eyes of the researcher. After that, adjust the eyepieces themselves. As a rule, a binocular microscope is equipped with one eyepiece with adjustment and one eyepiece without adjustment. If the eyepiece with adjustment is installed on the left, then set its adjustment ring to the neutral position (mark against the mark 0). Close the left eye and move the table to focus the image of the object for the right eye. Then close the right eye and focus the image of the object using the adjustment ring. When properly adjusted, the image can be seen comfortably with the eyes, even if the eyes have different properties. If the eyepieces are set incorrectly, the eyes quickly get tired, a headache appears.
2. Different lenses require different lighting. The lower the magnification of the lens, the lower the brightness of the lamps should be. You can remove bright light in various ways: reduce the aperture, reduce the incandescence of the lamp, use a neutral density filter. It should be remembered that when the lamp incandescence decreases, the image of the object acquires a yellowish tint. Therefore, it is necessary to combine the optimal opening of the diaphragm with a decrease in the light flux with a neutral density filter. The use of a blue filter increases the resolution of the microscope because blue has a shorter wavelength.
3. Raise the condenser to the level of the stage, open the diaphragm. Lower the object stage or raise the tube (depending on the microscope design) for free rotation of the revolver with objectives;
4. Set the correct illumination of the microscope. To do this, it is necessary to install a low magnification lens (10x), raise the condenser to the upper position, focus the image of the preparation by moving the table, and close the field diaphragm. By moving the condenser up and down, set the sharp edge of the field diaphragm. Using the adjusting screws, set the condenser in the middle of the field and open the field diaphragm to the outer field of view.
5. Turn the revolver to set the lens with a magnification of 20 x or 40 x (if the lens is correctly installed, the lock should click). Looking into the eyepiece, place the image of the object in the center of the field of view. After that, raise the lens and apply a drop of cedar oil to the test preparation. Install the oil immersion lens by rotating the revolver. Then, looking from the side, with a slight turn of the macrometric screw, immerse the front lens in a drop of oil, after which it is necessary to look into the eyepiece and carefully raise the tube until the object is visible. By slightly turning the micrometer screw back and forth, adjust the clarity of the image.
6. For work it is necessary to use high-quality glass slides. For large aperture objectives, it is essential that the coverslip be of the standard 0.17 mm thickness. If the lens has the inscription "0.17", then it is designed to work with a cover slip. In this case, the presence of a cover slip on the slide improves the image quality.
7. After every 30 minutes of work, a five-minute rest is necessary.
8. After finishing viewing, you must:
Raise the tube;
Rotate the revolver to set the lens with minimum magnification;
Remove oil from the lens of an immersion objective with a cloth lightly soaked in a small amount of xylene or benzene;
Remove the glass slide from the microscope stage, wipe the stage with a napkin;
Close the opening of the table with a clean, dry cloth;
Turn off the lights and cover the microscope with a cover.
Instructions to read, as a rule, laziness or no time. You, for sure, would like to have some friend who will explain everything in detail and show you how to use a microscope. And you should not only educate yourself or brush up on school skills, but also teach your child, who may become a biologist or researcher in the future.
How to use a microscope? At first, you need to understand that this is one of the simplest optical instruments, learning to use which is not difficult.
Remember: light passing through an object or reflected from an object passes through the lens and eyepiece of the microscope, and presents an enlarged image in front of your eyes! This is the principle of working with a microscope.
So, we will need:
- object of study
- directed beam of light
- selected lens
- selected eyepiece
- focus knob to adjust image clarity
The light in the microscope is presented in the form of upper and lower illumination. The backlights are powered by AC or batteries and are turned on by pressing a button on the case. There are also microscopes in which there is no upper illumination.
First of all, determine what you are going to look at with a microscope. If this is an object that transmits light, but it must be fixed between a slide and a cover slip and use lower illumination.
If it is an object that does not transmit light, then simply put it on the stage under the lens and use the top illumination.
Objects suitable for viewing under a microscope in transmitted light (lower illumination): parts of insects (wings, legs, heads, etc.), sections of leaves and plants, sections of cereals and legumes, dust, scale, water and all liquid micropreparations , protozoa, fungal microorganisms, etc.
Objects that are recommended to be viewed in a microscope in reflected light (upper illumination): coins, stones, paper, cloth, whole insects, wool and hair, plastics and other dense synthetic materials, soil and rock samples, leaves and whole plants, wooden surfaces, any objects and fabrics that do not transmit light.
The next thing we need to do is place the object on the stage. We arrange it so that the axis of the lens points exactly to the area that we want to see enlarged. In order for a clear image of the object to appear in the eyepiece, it is necessary to set the minimum objective on the revolving device (for example, 4x) so that it is perpendicular to the axis of the stage.
Next, you need to insert the eyepiece into the eyepiece tube, and slowly raise the object stage using the focusing mechanism from the lowest point to the top. In this case, it is necessary to look with the eye into the eyepiece until first a blurry, and then a clear enlarged image of the object appears.
Now you can enlarge the object even more! To do this, we use a lens of greater magnification and re-focus. It is very important that when changing lenses and eyepieces, the object is securely fixed on the stage and does not move. Otherwise, the search will need to be carried out again.
The magnification is considered very easy - you need to multiply the magnification of the eyepiece by the magnification of the lens used at the moment. For example, we are using a 10x objective and a 16x eyepiece, so our actual magnification will be 160x!
We hope that the article suggested how to use a microscope. On our site you will also find a lot of useful information to work with these devices and easily increase your level of knowledge.
Report.
Progress.
Practical work №1.
By discipline: "Microbiology, sanitation and hygiene in the food industry." Topic: Studying the device of a microscope according to a drawing and mastering the technique of microscopy.
Practical work No. 1
Preparatory part
| Content | Time | WMD |
| 1. Construction. Greetings. Reporting lesson objectives. 2. Combat exercises: Fulfillment of the commands “Become!”, “Equal!”, “Attention!”, “At ease!”, “To the right!”, “To the left!”. 2. Walking and its varieties: a) normal c) on the toes of the hand on the belt c) on the heels of the hand behind the head e) on the outside of the feet 3. Running and its varieties: shins e) attached right and left side d) back forward | 30sec 2min 3min 3min 5min | Appearance (presence of a sports uniform) Monitor the correct posture Running at an average pace |
| Main part | ||
| 5. Teach general educational exercises turning left and right by stepping over, jumping a) imitation of exercises turning left and right by stepping over, jumping c) performing exercises turning left and right by stepping over, jumping 6. Fix general educational exercises opening to the width of the arms raised to the sides. a) performing exercises opening to the width of the arms raised to the sides. 7. Improve general educational exercises discrepancy in predetermined places. a) performing exercises divergence in predetermined places. 8. Improve running in alternation with walking a) running in alternation with walking | 5min 3min 3min 3min 5min | Monitor the correct execution Monitor the correct execution Monitor the correct execution Monitor the correct execution |
| Final part | ||
| 10. Exercise to restore breathing: Slow walking, while inhaling, raise your hands to the top, while exhaling, lower them down. 11. Construction. Summing up the lesson. 12. Homework | 1min 1min 30sec | Arrange exit from the gym Outdoor games |
Spas - Klepiki 20__
Subject: Studying the device of a microscope according to a drawing and mastering the technique of microscopy.
Target: To study the device of a microscope and master the technique of microscopy.
Work equipment: Microscope, workbook, pen.
1. Uncover the microscope. 2. Carefully put on the desktop and inspect the appearance. 3. Learn the basic details of the microscope and write in your workbook.
1. Draw a picture of a microscope. 2. Describe how to use a microscope.
1 - stand. 2 - micrometric screw. 3 - coarse screw. 4 - removable light filter. 5 - box with micrometer screw. 6 - tube holder. 7 - eyepiece. 8 - tube. 9 - revolver. 10 - Lens. 11 - subject table. 12 - capacitor. 13 - iris diaphragm. 14 - condenser handle. 15 - mirror.
1. The microscope is removed from the case and carried to the workplace, holding it with one hand on the tripod handle, and with the other on the tripod leg. It is impossible to tilt the microscope to the side, because the eyepiece may fall out of the tube.
2. The microscope is placed on the desktop at a distance of 3-5 cm from the edge of the table with the handle towards you.
3. Set the correct illumination of the field of view of the microscope. To do this, looking into the eyepiece of the microscope, a mirror directs a beam of light from a desktop illuminator lens. When properly set, the field of view of the microscope will appear as a well-lit and evenly illuminated circle.
4. The preparation is placed on the object table and fixed with clamps.
5. First, the specimen is examined with an 8* lens, and then it is moved to a higher magnification. To obtain an image of an object, it is necessary to know the focal length (the distance between the lens and the preparation). When working with an 8* lens, the distance between the preparation and the lens is about 9 mm, with a 40* lens - 0.6 mm and with a 90* lens - 0.15 mm. The microscope tube must be carefully lowered down using the macrometric screw. Watching the lens from the side, and bring it closer to the preparation (without touching it) at a distance slightly less than the focal length. Then, looking into the eyepiece, the same screw, slowly turning it towards itself, raises the tube until the image of the object under study appears in the field of view.
After that, by turning the macrometric screw, the lens is focused so that the image of the lens becomes clear. The macrometric screw must be rotated carefully, but not more than half a turn in one direction or another. When working with an immersion objective, a drop of cedar oil is first applied to the preparation and, looking from the side, the microscope tube is carefully lowered with a macrometric screw so that the tip of the objective is immersed in the oil drop. Then, looking into the eyepiece, the tube is very slowly raised with the same screw until an image appears. Fine focusing is done with a macrometric screw.
6. When changing lenses, adjust the illumination intensity of the subject. By lowering or raising the condenser, the desired degree of illumination is obtained. For example, when viewing a preparation with an 8* lens, the condenser is lowered, when switching to a 40* lens, it is slightly raised, and when working with a 90* lens, the condenser is raised up to the limit.
7. The preparation is considered in several places by moving the stage with side screws or moving the slide with the preparation manually. When examining a preparation, the macrometric screw should always be used in order to examine the preparation in its entire depth. Before replacing a weak lens with a stronger one, the place of the preparation, where the object under study is located, must be placed exactly in the center of the field of view and only after that turn the revolver with the lens.
8. During microscopy, keep both eyes open and use them alternately.
9. After finishing work, remove the preparation from the object table, lower the condenser, place an 8* objective under the tube, remove immersion oil from the front lens of the 90* objective with a soft cloth, and put the microscope back in its case.
RULES OF WORK WITH THE MICROSCOPE
1. Place the microscope with a tripod towards you at a distance of 5-10 cm from the edge of the table. Bring the microscope into working position by tilting the top of the tripod 45 degrees. Use a mirror to direct the light into the opening of the stage.
2. Place the prepared preparation on the stage and secure the slide with clips.
3. Using the screw, slowly lower the tube so that the lower edge of the lens is 1-2 mm from the preparation.
4. Look into the eyepiece with one eye, without closing or closing the other. While looking into the eyepiece, use the screws to slowly raise the tube until a clear image of the object of interest appears.
5. When changing lenses, switch smoothly to avoid scratching the lenses. Use the screw to fine-tune the image.
6. After work, use the screws to lift the tube. Make sure that the lens with the lowest magnification is pointed into the opening of the stage. Remove the specimen from the stage. Place the microscope in the non-working position.
A microscope is a fragile and expensive device: you need to work with it carefully, strictly following the rules.