You can make a lot of things out of paper. Various beautiful and unique products that will delight you every day. Each of us has been in a situation where it was necessary to put small things, but there was nowhere. I had to look for various jars, boxes to pour them in there.
But you could do without all this and make a beautiful version of an envelope out of paper. He will be able to serve in various situations in life as a good service.

A paper envelope is always useful. You can put money, any small things in it. And of course, do not forget what they are directly intended for. You can put a letter in the original envelope dear person, or attach a valentine greeting.

Envelope for all occasions
Now on the Internet you can find a lot of step by step diagrams for folding envelopes with your own hands. Each of these envelopes is original and suitable for everything. Now we will try to make one of these envelopes, which is suitable for storing money.

You can use paper to make it. different colors and shades. So, let's proceed to the step-by-step assembly of our envelope.


The first step is to take a rectangular sheet of paper and fold it in half. We unfold, and we have a clearly visible middle of the sheet. At the bottom we find the middle and mark it with a pencil. To measure it, it is better to use a ruler.

In the second step, fold the corners on top of the sheet to its middle. We tuck the side edges to the center, and tuck the remaining edge on top inside the envelope. We unfold it on the reverse side and bend the edges of the envelope. We unfold the envelope inward, bend all the remaining flaws. All your envelope is ready, you can put money in it and keep it.

As you can see, in this way you can make any envelope for any occasion, and for any life situation. For many, this scheme seemed very complicated, but in fact it is simple. The most important thing is patience and the ability to understand in detail all the nuances of origami.

Envelope schemes
At home, everyone can make any envelope that he wants. It can be an ordinary envelope of various shapes. For example, a rectangular, square or triangular envelope.

Of course, some people want to do something unique, not like all these ordinary things. Here, of course, various detailed instructions how to make an envelope with your own hands. Now there are a lot of them on the net and they are made in the most diverse form.

It will be possible to make an envelope that will be decorated with a heart. This envelope is perfect for Valentine's Day. It will be possible to put both a beautiful Valentine card and an original small gift in it. Undoubtedly, your significant other will love this kind of attention.


Envelope to help the gardener
A lot of people live in countryside. Someone has houses there, dachas. Some live there all the time, while others come only for the summer. Of course, you all know that feeling when the season of planting and harvesting comes.

All seeds need to be stored somewhere all the time between seasons. There are many photographs of origami envelopes in which the seeds are stored.

It is clear that we will not be able to contain large seeds in them. However, they are perfect for storing flower seeds, various vegetables and berries.

In such an envelope you can put a sufficient amount of seeds that will be useful to you in the spring. The most important thing is that each envelope can be signed, and you do not have to figure out where, what you have hidden.

Each of us can make an envelope at home. How to make an envelope with your own hands? Many of us have asked this question, but it is not so difficult. What could be easier than this.


Take a sheet of paper and fold it in half. Then fold a little inward from one edge and glue it. Do the same for the long side. Here is an envelope ready for you, which is suitable for any occasion.


As you can see, there are many options for making origami envelopes. Here you can fantasize a lot and create various forms. You just need to think a little and bring your idea to life. Use all your patience and, undoubtedly, you will be able to create a masterpiece even from an envelope.

Various master classes for beginners on origami envelopes can also come to your aid. From them you can take the idea for your creativity and make something of your own. For beginners, they can be good advisers in learning origami.

As a rule, in such master classes there are detailed video instructions for assembling envelopes. The most important thing is practice, you need to train more often and try something new. Each time you will get better and better.

Photo of origami envelopes


Origami is an amazing art that allows you to make amazing things from an ordinary sheet of paper that can serve not only as interior decorations, but also as useful, necessary things in everyday life, such as origami envelopes.
Exists a large number of a technique for making paper envelopes suitable for various occasions. They can put a little note for a loved one, envelopes are often used as original invitations to any events, such as a wedding, and are also convenient for storing and transferring money as a gift. Therefore, people are often interested in how to make beautiful envelopes with your own hands? For example, a rectangular Japanese envelope or a flower envelope? Where to watch mk for beginners or children? Or for beginners? In our article, of course!
The easiest way to fold an envelope from a sheet of paper is make it square. Such envelopes are universal, since you can put a note or a whole letter in them if the craft is made from a large sheet of paper, and also use it to wrap gift money. To make origami, you need a square sheet of paper of the right size, and the paper can be plain, white, or special for scrapbooking, which is not only initially square, but also decorated with interesting patterns. How to make an origami envelope in this way, read below:
- Cut out a square or take originally square paper.
- Fold the shape diagonally to make a triangle.
- Bend one corner at the largest base so that its end touches the middle.
- Wrap the second corner so that it overlaps the first, and its end reaches the opposite corner of the resulting square.
- In the triangles, peculiar pockets turned out, and now you need to fill one triangle into the pocket of the other. Try to do everything as carefully as possible so that the envelope comes out even.
- It remains only to bend the top part, and the envelope is ready. To securely close the resulting envelope, use decorative tape or glue.
money envelope
When there is no time to puzzle over a gift and choose the most suitable one from a thousand options according to all criteria, they usually give money in its pure form so that the person himself acquires what he needs. However, even such a gift as money requires elegant packaging, in which it is pleasant to receive any little thing. Making an origami envelope for money is very simple, and it takes a minimum of time. With it, the gift will acquire a touch of originality, and it will be doubly pleasant to receive it. Manufacturing scheme quite easy and uncomplicated:

Heart shaped envelope
Heart envelope especially suitable for love notes or Valentine's Day valentines. Beloved will always be pleased to receive such an envelope from a loved one at any time. In addition, the paper heart looks very cute, which makes it popular among other origami envelope making techniques. It is very easy to make such a cute craft:
- Place a square sheet of paper in the shape of a diamond.
- Bend the sheet in half to the right and also down, getting a rhombus with two perpendicular diagonals inside.
- Bend the upper corner of the rhombus to the middle of the sheet.
- Bend the bottom corner so that its end touches the center of the formed line at the top.
- Now a line has formed below, and you need to find its center, being equal to which you need to bend the side parts of the paper.
- Fold in the sharp corners on the side and top to give the heart a softer, rounder shape.
surprise envelope
For small items, such as jewelry, it is difficult to find a suitable package that would fit the size of the items, be inexpensive and at the same time perfectly complement the gift. A surprise envelope is one of the origami techniques for making envelopes, which is different in that you can put small things in it, and they will not peek through the package, spoiling the surprise. How to make a surprise envelope, you can find out if you read a small scheme for making such crafts:

Origami envelopes are great to send notes or donate money. Great amount various techniques allows you to make original envelopes for packing a small present or note, which will make its contents more pleasant and interesting.
Today we want to tell you how to make an origami paper envelope in the shape of a square with your own hands. In our master class, we will look at two schemes for collecting envelopes using the Japanese art of origami, and step by step descriptions with detailed photos will explain how to make them right.
Tools and materials Time: 10-30 minutes Difficulty: 4/10
- patterned colored paper for origami / scrapbooking;
- scissors;
- ruler;
- glue universal;
- pencil or pen;
- decorative adhesive tape or stamp with a sticker.
Step by step instructions with photo
To make the envelope, we used sheets of glossy design scrapbooking paper that were originally square in shape. Of course, you can use any other paper that you have at home, but then your envelopes will not look so colorful!
Congratulate your loved ones for the holidays with gifts packed in miniature paper envelopes that you made yourself! Undoubtedly, they will appreciate such a present!

For making crafts, you may well involve children and, of course, it will be a fun and interesting pastime for all of you!

Method 1. A simple origami envelope
Step 1: cut out the square
Take some pretty colored paper and cut a square out of it. If your paper is originally square, skip this step.
Step 2: Fold Diagonally
Take your square and fold it in half diagonally.

To make the largest origami envelope with sides 14x14 cm, we used a square of white and green striped origami paper measuring 30x30 centimeters. The medium envelope with sides 11.5 x 11.5 cm was made from a piece of thick glossy paper in a red-pink checkered size 25x25 cm. And finally, the smallest envelope was made using a piece of colored paper with a strawberry pattern measuring 20x20 cm. finished crafts was 9x9 cm.
Step 3: Wrap the Corners
- Place the resulting paper triangle in front of you with the folded diagonal side down.
- Using a ruler and pencil, divide the bottom of the triangle into three equal parts.
- Fold the right corner of the triangle forward a third of its length and fold down towards the left.

In the same way, wrap the left corner of the triangle by its third part of the length towards the right side.

Step 4: Fold the Corners
You now have two open triangle pockets.

Open the triangles back. Slide the left triangle and place it in the right pocket. Using a ruler or your fingers, carefully iron all the folds so that the envelope is as even and flat as possible.

Step 5: Wrap the Top
Using a ruler, evenly wrap the top of the craft down and form a neat envelope.

A simple do-it-yourself origami paper envelope is almost ready! You just have to fill it with small gifts, goodies or money and seal it with a sticker or a piece of decorative adhesive tape.

If desired, write on the envelope the name, address or affectionate nickname, as you used to call a person close to you. Don't forget to add cute words and wishes!

Method 2. square origami envelope
This stunning square paper origami envelope has a double bottom. And if you decide to give a gift in such an envelope, you can make a double surprise by packing two different presents in each bottom!

Step 1: cut out the square
Cut out a perfect square from colorful origami paper. Keep in mind that the dimensions of the finished envelope will have sides 1/3 the length of the original sheet.

Step 2: Fold the Square
Using a ruler and a pencil, divide one of the sides of the square into three equal parts.


Make the folds as sharp as possible, which will make it easier to work in the future. Just don't wrinkle too much or you could ruin the paper!
Repeat the same folds in the other direction.

You should end up with a square with nine identical square sections.

Step 3: Add Folds
Make a diagonal fold.

Repeat the diagonal pleats in the other direction.

Take one of the corners and fold it to a point in the middle.

Bend to the point in the middle the remaining 3 corners. You should have the following folds.
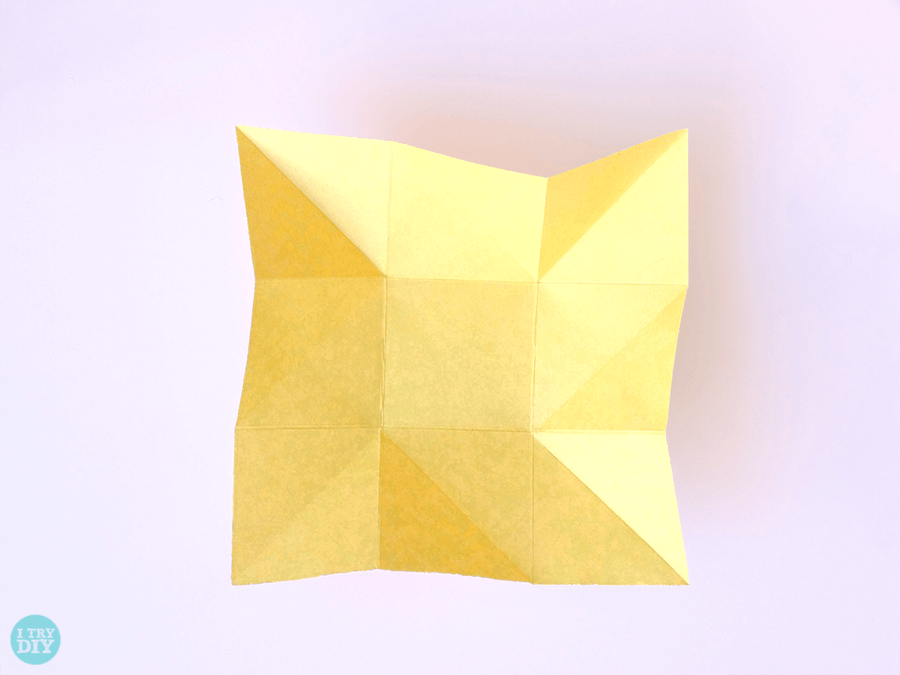
Step 4: make a pinwheel
If you look carefully, you will see in front of you a craft in the form of a pinwheel with folds. You need to keep this in mind for the next steps.
Take two opposite corners and pinch them with your thumbs and forefingers.
Holding the corners, slowly twist them on both sides in a clockwise direction. You will feel the corners pull in opposite directions. This is where you need to figure out how to twist your paper towards the center.

You'll know you've done everything right when your square looks like a pinwheel with a square in the center.

Iron the folds well with a ruler.
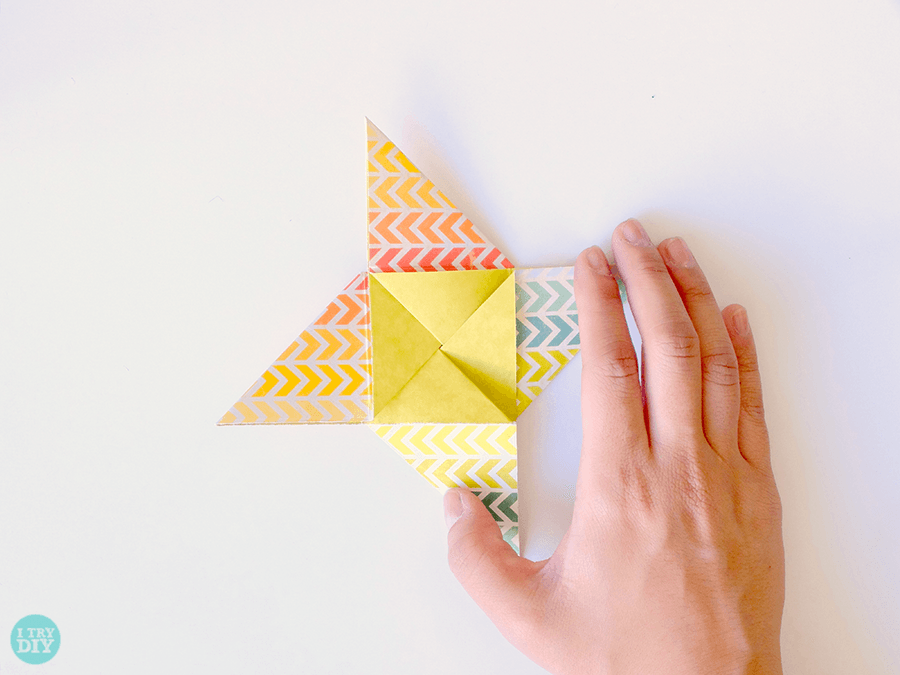
Step 5: close the envelope
Now let's close our square origami envelope! Take the left half and fold it towards the center.

Do the same for the bottom valve.

Close the right valve.

Tuck the remaining top flap into the small pocket under the first/left sinus. This will allow you to save the closing area.

You did everything right!
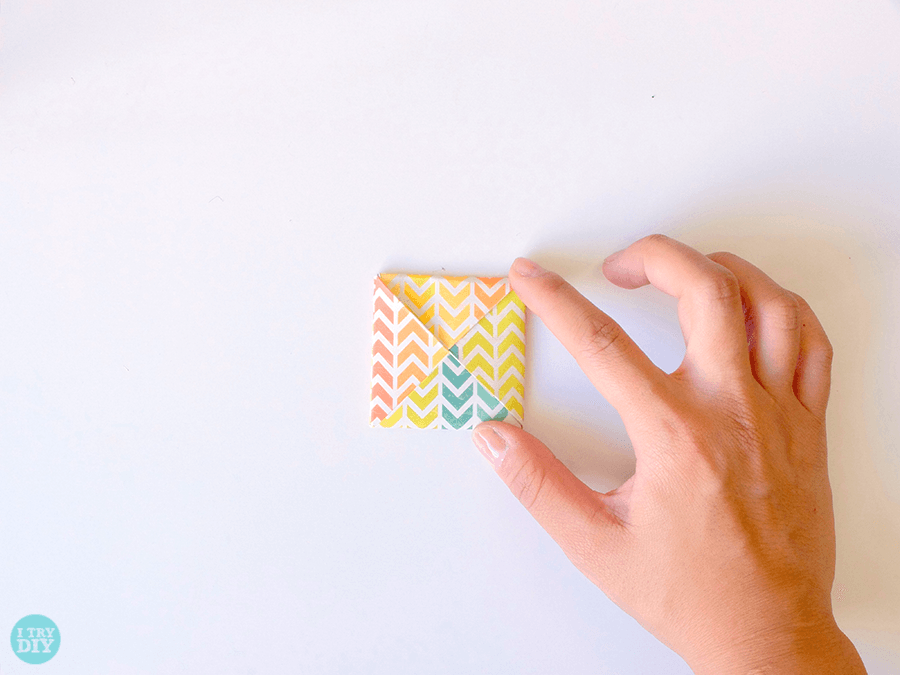
Here you can see how to put a small sticker in an envelope. Instead of a sticker, you can use any small inscriptions, wishes or money. What would you put in such an envelope?

See how simple it is! We hope you enjoyed our tutorials with diagrams, in which we showed how to make an origami envelope, and you will share photos of your products with us. And if you still have questions, watch the video, which clearly shows how to fold an origami envelope from a regular sheet.
Have you ever received letters? Maybe yes. Did you pay attention to the envelope? What was he like on appearance? Most likely, it is composed of ordinary white paper. The address of the sender and recipient is written on the front side. Nothing surprising. But in ancient times, this paper bag had an unusual look.
This romance from the past can be transferred to ours modern time. An origami paper envelope provides such an opportunity. What is it, how to make it and what is the value of crafts? In this article, we will address each of these questions.
In ancient times, as soon as writing was born, people somehow needed to exchange information. It was not always possible to do this verbally, especially if distance was an obstacle to communication. Therefore, people came up with an envelope in which a sheet with a written letter was placed, since it was risky to send the sheet itself. First, dirt could get on it. It is unlikely that in this case it was possible to make out the message. Secondly, the letter enclosed in an envelope kept confidentiality. If the seal was broken before receipt, the messenger risked not only losing his monthly salary, but could also lose his head.
In addition to preserving the integrity of the letter, the envelope was also used for other purposes: the recipient's address and his first and last name were indicated on the front side. The messenger became known as the postman. His job was to deliver messages to specified addresses.

The role of envelopes in the modern world
Of course, now many people use an electronic mailbox. There is no need to buy an envelope separately to send your letter. But in the business world, classic etiquette is still preserved: people have not stopped using envelopes. They were even divided into corresponding types. Letters are official business, congratulatory, personal, etc. This means that the envelope must also correspond to its contents. As you know, not only letters can be sent through the mail, so the envelope is also suitable for other tasks. For example, you can send financial resources, postcard, correspondence, etc. Of course, now there are options for a wide variety of envelopes, but it is more interesting to make it yourself. Therefore, you should familiarize yourself with the types of envelopes and the principle of their manufacture.
Envelope of own production
Before you start creating an origami envelope out of paper, you must first acquire all necessary materials. You need to start with paper. Just her choice is quite large. It can be plain white or double-sided, vintage, colored, textured paper. The manufacturing process itself does not take much time. And besides, it's very exciting! Let's start with the simplest.

Regular envelope
Depending on your desires, choose the color and size of paper you need. The leaf should be square. Then do everything step by step:
- Take the paper in your hands and fold it in half, but do not make too much bend.
- Pay attention to the bottom of the leaf: it needs to be bent to the main deflection.
- Now you should re-bend to the middle of the sheet.
- After the bottom is bent, you can proceed to the side parts.
- The top corners should be larger than the bottom ones.
- It turned out a triangle that needs to be closed.
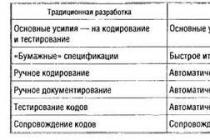
In this way, you have created the most common origami paper envelope. As you have seen, no special efforts are needed here, as well as auxiliary materials. But the next option will be a little more difficult.
Unusual envelope
If you want to congratulate family or friends on some important event, but cannot do it in person, send a congratulatory letter. To make the product you will need a pencil, ruler, glue, paper, scissors. This work should be done in stages:

- Lay a sheet of A4 paper on the table. From the left and right corner from the bottom, mark 72 mm. Mark the distance with bold dots.
- Place a ruler on a sheet of paper and draw a pencil from the bottom up. Do the same with the right corner. Only in the upper region the line should rush to the lower center.
- Now you need to use scissors to make a cut along the pencil marks. Cut out the marked edges. After that, a figure like a parallelogram is obtained. So, the main part of the envelope is ready.
- Lay the envelope on the table so that the top and bottom two corners can be folded in toward the center without overlapping. Bendable corners are well smoothed.
- We bend the lowest corner to the other two in the center. He needs to cover them.
- The last step is for the glue. Spread it on the bottom corner and carefully glue it to the other two.
Soldier's envelope
This option resembles a military cap: the origami shape of the envelope looks like a triangle. The product is easy to make, and it will turn out to be a very original version.
You can make a soldier's envelope as follows:
- You need to take a sheet of any color so that it is rectangular.
- Then combine the short side of the sheet with the long one.
- So it turns out a triangle, but there will be an extra piece of paper. An additional piece will resemble a rectangular ribbon.
- The resulting triangle must be bent in half to form an isosceles triangle with the same strip.
- Now you need to take up the strip, which previously interfered. Turn its corners to the base of the triangle itself.
- The formed tongue can be tucked into the top pocket.
During the war, this style of paper envelope was used by the military and civilians.
English envelope
An aristocratic-style English envelope is an elegant and very convenient way to send letters.

- Before you send someone a love message or congratulatory words, write the text on one side of a rectangular piece of paper.
- Keep padding at the top and sides.
- Bend a piece of paper to the height of the text. The deflections should occur three times, eventually getting a strip.
- Bend it, and then combine the two sides with glue.
- As a result, your text will remain hidden from prying eyes, and only the one to whom this message is addressed will reveal it.
Children's envelope
If parents want to give something small to their children, it would be wise to place such a surprise in a beautifully designed envelope. It is slightly different in manufacturing principle from the previous versions, however, this is a very original envelope that has all the useful features that the main envelope has. For example, official envelopes are too plain and uncomfortable for children, and the children's version can even act as a small wallet. There the child, at will, saves his money for expenses. Younger children can simply play with such crafts: paint in different colors or glue various paper parts.

You can make an origami envelope for children as follows:
- Take the rectangular piece of paper again. The top two corners need to be bent down to the center in such a way as if you were making an airplane.
- Roll the resulting upper corner down to get a parallel between the bottom and top of the sheet.
- Now repeat the same on the other side. The workpiece must be turned 180 degrees. Then connect the bottom with the top so that the fold lines intersect with each other.
- Flip the folded envelope down and you'll have a rectangle. Unfold the previously folded strips so that the front of the envelope resembles a rectangle, with only one cut. Then open the incision, and fold the envelope.

standard style
As mentioned above, you can send a "valentine" or congratulations in an envelope. They also store discs, which is quite convenient. Let's look at the option of creating a congratulatory envelope.
Heart envelope
From the materials you will need decorative, cardboard and thick paper 30 by 30 cm. Beads, artificial flowers, ribbons, etc. can be used as decorations.
Step by step production:
- On the cardboard, draw the outlines of a heart with a pencil. Then cut along the drawn lines.
- Attach the cut piece to the decorative paper. Then indent the top edge by one centimeter.
- From the top side of the sheet, draw a line at a distance of 12 cm. After that, draw a second line parallel to the first at a distance of 10 cm. Now it remains to draw vertical lines that will begin and end at the end points of the two horizontal ones.
- Cut out the heart according to the indicated drawing.
- The last step will be decorating the craft. Just for this, you saved beads, leaves and ribbons. An envelope fastened with a ring will look very elegant.
Karina is a permanent expert of the PupsFull portal. She writes articles about play, pregnancy, parenting and learning, baby care, and mom and baby health.
Articles written
Despite the variety of finished printed products, a do-it-yourself origami envelope made of paper, like any hand made, is always appreciated and attracts attention. Money, greeting card and even a mini-surprise, will be elegantly packaged and will delight the recipient, thanks to ancient Japanese art. Each message has its own model, for example, on Valentine's Day it is customary to give a variety decorated with a heart, and small gifts are “hidden” in a special envelope with a double bottom.
Easy and practical
Gone are the days when stacks of postal envelopes were kept in every home. Letters are now written exclusively by email, and messages are sent to relatives or friends through numerous instant messengers. But if necessary, it costs nothing to fold an exclusive origami envelope in a few minutes. You can use both special paper and packaging, for example, “borrowed” from the main gift, craft, and even a fragment of wallpaper from an old repair stock.
You will need one square sheet with a side of 21 cm. It will make a universal envelope for both a cash gift and a postcard.
Step-by-step instruction:
- We place the square with the vertex towards us. If one of the sides of the paper is white, you need to start with it.
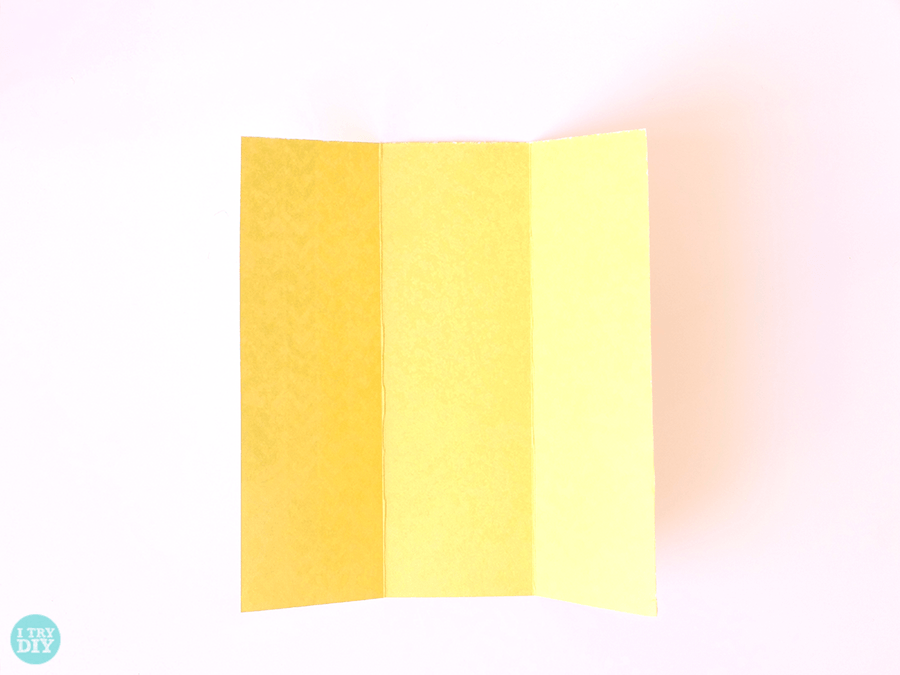
- Fold from left to right.
- We reveal.
- Fold up from bottom to top.
- We reveal.
- Fold the left outer corner towards the center.
- By analogy, we act with the right. The top corner is also folded to the center. Having outlined the fold line, return to its original position. Now we raise the lower corner to the just marked mark. Iron the fold and open.
- Fold the bottom corner up to the line just marked.
- “Close” to the same mark the right and left side blanks.
- We push the central valve forward and, making a reverse fold, place it on top of the side elements.
- We fold the lower part, as is usually done with envelopes, and turn the central valve inward - it serves as a retainer so that the paper structure does not fall apart. If desired, you can glue the part, but this is not at all necessary.

Based on this simple model, you can make a charming origami envelope with a bow, which even beginners can do.
"Windmill"
The Japanese often make decorative "locked" bags called "tato" out of paper. Souvenir coins, magnets, jewelry and other relatively flat items can be placed in them. The package does not open itself and securely stores its "secret". It looks original and stylish, and after the gift is removed, it can be used as Christmas toys or pendants for interior decoration.
In the Russian-language version, tato bags were nicknamed "Vetryachok" for the similarity of the lock on them with a children's toy windmill. This origami envelope is best made from paper with two differently colored sides.
Step-by-step instruction:
- We need a square 21x21 cm.
- We designate diagonal folds on it.
- We bend the bottom corner so that its top falls 1/3 above the center. Precision is not needed here.
- Bend the top back to the fold line.

- Fold the flap towards the center.
- Repeat steps 3-5 for the rest of the corners. We start from the right. Now fold it 1/3 above the center.
- We bend the valve in the opposite direction, aligning it along the middle axis.
- And return the top to the center.

- The same algorithm is applicable for the top corner.
- Now for the left.
- However, we have not yet succeeded in milling.
- In order to fully assemble it, you need to re-open the left side and bottom of the workpiece.

- Now we make a reverse fold below and on the left, leading the previously open part under the bottom.
- We beautifully straighten our “mill”, which fastens the origami paper envelope without any glue and does not allow it to fall apart.


Secret object
Based on special Japanese menko cards, they make origami envelopes with a surprise. Their feature is the presence of a double bottom, which allows you to hide a miniature gift or a secret note. For the model you will need a square sheet of paper, 21x21 cm in size.
Walkthrough:
- Lay the sheet white side up.
- Fold the bottom right corner over to the top left. We open the workpiece.
- Bend the lower right corner to the central axis.
- Here is the resulting figure (see Fig. 4).

- Lower the upper left corner to the bottom edge.
- We partially iron the fold line, only outlining it.
- Fully straighten the workpiece.
- We bend the left edge to the last crease we created.

- Expanding the model.
- We fold the right edge to the same mark.
- Bend the lower part up to the first diagonal line.
- We lower the upper edge to it. As a result, we should get a grid of 9 identical sections.

- Rotate the workpiece 90° clockwise.
- Fold back the top right corner.
- Iron the crease well.
- Expand and do the same with the other three sides.

- Here's what we should get.
- "Close" the right side to the left.
- Open the middle part up, as shown in the figure.
- We straighten the bottom of the figure. We create a semblance of the basic form "Windmill".

- Pull the leftmost point down.
- We press and smooth the resulting "blade".
- We stretch and straighten the left side, continuing to act according to the "Windmill" scheme.
- The top of the figure needs to be opened a little in order to fold the last “blade” of our conventional windmill.
- Smooth out the straightened part.
- We get a shape very similar to the Windmill, but with an envelope in the center.

- We turn over the workpiece.
- Bend the right corner to the left, overlaying the central part.
- Raise the bottom one up.
- Fold the left corner to the right
- Top - down.
- We insert it into the "pocket" of the right section.

It turns out an unusual model with two "compartments", like a purse. You can put a gift in one, a congratulatory note in the other. Ready-made origami "menko" envelopes look sophisticated, especially if they are made of paper with an oriental pattern:

Mini models are often used for jewelry:

heart
A "heart" theme is a traditional choice for Valentine's Day, but it doesn't have to be limited to just this holiday. Any note with warm words of love will touch the recipient even more if it is enclosed in an origami envelope decorated with a heart. Its scheme is simple, respectively, the folding process will not take much time. Even in the morning, running away to work, you can have time to make a “message” and leave it on the table or refrigerator door.

You will need a rectangular sheet, A5 or A4 format, if you need an envelope for a standard postcard. It is advisable to use paper with different colored sides.
Fold the sheet in half along the long side and open. We bend both upper corners to the central axis. We turn over the workpiece. We fold the lower part up along the fold line indicated in the figure. We return the model to the front side. Bend the sides to the midline.
We open the outer corners and with the help of a reverse fold, we bring it inside the figure. Flip it over to the back. We fold the upper part with a “valley” along the line indicated in the diagram. We bring the outer corners of the “heart” that has already appeared inside. Bend the inner ones. The origami envelope is ready. Notes or postcards are put in a pocket under the "heart".
An elegant model for all occasions
An origami envelope decorated with a graceful leaf will be appropriate for any occasion: anniversary, wedding anniversary, declaration of love, gift to relatives or friends. It is also suitable for the effective presentation of money. The model is assembled without glue, from one sheet of A4 paper.
Gift envelopes in Japan
In Japanese culture, it is customary to treat gift wrapping with great trepidation. Even the most beautiful and valuable things, not wrapped and bandaged properly, not only will not bring joy, but will be perceived as an insult. Each case has its own packaging, bearing a certain symbolism. It could be good wishes, expression of gratitude, respect, admiration and so on.
One of the most popular gifts among the Japanese is money, which is customarily put in special envelopes - wear bukuro. Similar packaging exists all over the world, but the inhabitants of the "Land of the Rising Sun" have brought it to perfection. It is thanks to the envelope, which is a work of arts and crafts, that money is perceived as a full-fledged gift, and not as a way to show a minimum of attention.

Nosi-bukuro envelopes use paper self made"washi", which refers to the objects of the intangible cultural heritage of UNESCO. Thanks to the unique manufacturing technology, which originated in the 8th century AD. e., the sheets acquire an expressive, noble texture, their quality is considered unsurpassed. The envelope is necessarily decorated with mizuhiki knots made of thin colored twine. This is not just an exquisite decorative element, but an encrypted message. Depending on what event was the reason for the cash gift, weaving combines different colors and patterns. Etiquette in this respect is so complicated that board books with expert advice.
To make life easier for modern Japanese who want to donate money, special hand-made kits are sold for folding beautiful envelopes, which already have everything you need - from paper and diagrams to a suitable mizuhiki. For packaging, as for classic origami, no glue is used, it is held only by carefully thought-out folds. The cost of the finished envelope should be no more than 2% of the amount invested inside. For example, if the package price is 100 yen (approximately $1), you will have to give at least 5,000 yen.